發表文章

目前顯示的是 2月, 2018的文章
Related Posts Plugin for WordPress, Blogger...

5-21 Integrate All FindObjectOfType Into One Class

圖片
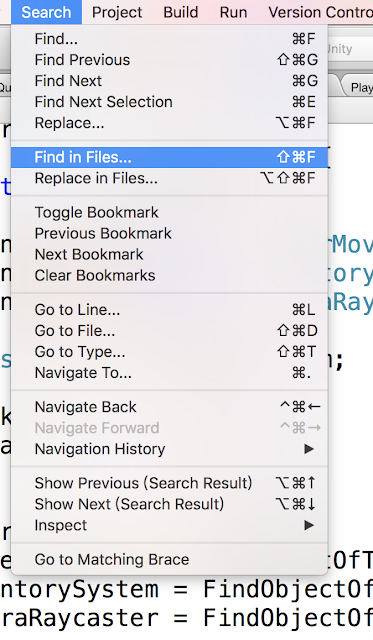
本章要介紹大家一個我覺得很方便的方法,主要因為最近遇到了要尋找某些Component時遇到困難,隨著專案的規模越來越大,我忘記了早期寫的一些Component要用FindObjectOfType來呼叫,該特定的Component在場景中僅會有一個。考量到使用這類型的Component時每次都用使用FindObjectOfType應該滿耗效能的,所以我就統一將這類型的Component集合在一個Class中。 首先我用Search/Find in Files的功能,尋找一下專案中有哪些地方使用到FindObjectOfType。 在輸入框中輸入FindObjectOfType,按下Find。 下列就會列出有用到FindObjectOfType的地方,如我的遊戲專案中有PlayerMovement、CameraRaycaster、InventorySystem。 再來我建立一個新的Script名為Game.cs,然後依照需要撰寫相關的FindObjectOfType,使用一個依賴MonoBehaviour的單例模式,寫起來很簡單。 using System.Collections; using System.Collections.Generic; using UnityEngine; using RPG.Character; using RPG.Inventory; using RPG.CameraUI; namespace RPG.Core{ public class Game : MonoBehaviour { public static Game Instance; [HideInInspector] public PlayerMovement playerMovement; [HideInInspector] public InventorySystem inventorySystem; [HideInInspector] public CameraRaycaster cameraRaycaster; WeaponSystem playerWeaponSystem; void Awake(){ Instance = this; playerMovement = FindObject

5-20 Change Weapon Config When Equipping Weapon

圖片
前面我們花了大量的篇幅製作了背包系統,現在就要來將背包系統跟我們遊戲中的武器系統進行整合,首先,我的背包系統換了一個新的介面,所以不要覺得奇怪為什麼變漂亮了XDD我是從這邊買的,如果大家也喜歡的話歡迎購買唷~我沒有在廣告,這介面也不是我做的。 https://assetstore.unity.com/packages/2d/gui/arrow-mobile-ui-for-ugui-64369 這次的修改沒有很複雜,主要在InventorySystem.cs的WearingEquipment方法中,呼叫WeaponSystem用來更換武器的方法。所以,重點在於要將JSON資訊跟Weapon綁定在一起。如果不懂我是怎麼在WeaponSystem更換武器的話,可以先看看以前的文章: 4-3 Weapon Pickup Points https://rpgcorecombat.blogspot.tw/2018/01/4-3-weapon-pickup-points.html 首先,我先將本次要測試更換的Simple Bow跟Orc Sword放到Resources資料夾。 然後修改JSON格式,多新增一個欄位EquipmentAssetsPath。 以下提供我目前完整的JSON格式: {"ConsumableEntityList":[ { "ID":1, "Name":"血量瓶", "ItemTypeString":"Consumable", "ItemQualityString":"Common", "Description":"+ 25 HP", "Capacity":10, "BuyPrice":10, "SellPrice":10, "Sprite":"Sprites/Items/hp&qu

5-19 Save And Load Inventory State Data

圖片
本章要來儲存背包內狀態,包含背包內的格子、箱子的格子、角色裝備的格子、鍛造的格子,但商店的狀態不用儲存。首先,請在介面上佈置好保存跟載入的按鈕,因為這個步驟沒有很難,就不特地講解了。如果不懂的話,可以先看看之前的文章。 5-6 Knapsack User Interface https://rpgcorecombat.blogspot.tw/2018/01/5-6-knapsack-user-interface.html 接著來修改InventorySystem.cs的程式碼吧,存檔方式很簡單,採用CSV格式,用逗號分隔每個slot的資料。若該Slot有放置物品,則會紀錄物品ID跟數量;若該Slot沒有物品,則會記錄數字0。儲存後的資料大致上會如下圖的形式: CSV格式的可讀性較差,或者以後有更複雜的資料形式也會更不容易儲存,那大家就可以考慮改成JSON或XML。 以下提供InventorySystem.cs的原始碼,主要新增了兩個方法,SaveInventory跟LoadInventory,使用Unity提供的PlayerPrefs方法儲存資料。 【Unity】遊戲存檔功能(PlayerPrefs) https://jerrard-liu.blogspot.tw/2015/05/SaveData.html using System.Collections; using System.Collections.Generic; using UnityEngine; using UnityEngine.Assertions; using UnityEngine.UI; using UnityEngine.EventSystems; using System.Text; namespace RPG.Inventory{ public class InventorySystem : MonoBehaviour { [SerializeField] ToolTip toolTip; [SerializeField] ItemUI pickedItem; [SerializeField] CharacterProperty characterProperty; public bool isPickedItem = fa

5-18 Forge Panel

圖片
本章要來教大家製作鍛造系統,首先,我們要有一個儲存鍛造公式的Json文件,分別紀錄材料ID跟數量,以及鍛造結果的ID,範例如下: {"ForgeFormulaEntityList":[ { "Item1ID":15, "Item1Amount":1, "Item2ID":17, "Item2Amount":2, "ResultID":13 }, { "Item1ID":16, "Item1Amount":1, "Item2ID":17, "Item2Amount":5, "ResultID":8 } ]} 記得要將Json文件儲存在Resources資料夾底下,我們會用Resource.Load讀取。 接著,因為目前的介面已經滿了,所以我將商店的介面藏起來,如下圖。 隱藏的方式,請在Vendor Panel的Inspector內設定Panel的Panel Alpha為0,Canvas Group的Alpha為0即可,如下圖。 接著我們複製一下Vendor Panel重複利用。 取名為Forge Panel,我們的鍛造介面只需要兩個Slot,所以將其他無用的Slot刪除。 我複製了Close Btn,改成啟動鍛造的按鈕,取名為Forge Btn。 在Forge Btn底下新增UI/Text,文字寫『開始』,請大家自己設定一下字型大小跟顏色。 完成後,介面大致上如下圖。 接著建立Script名為ForgeFormula.cs,這是要用來放置解析Json資料後的類別。  ForgeFormula.cs: using System.Collections; using System.Collections.Generic; using UnityEngine; using System;

5-17 Vendor Panel

圖片
今天要來製作商店功能嘍!玩家要購買物品時,可以用滑鼠右鍵點擊商店的物品,也可以將背包的物品丟到商店內,藉以賣掉物品。首先,我們來複製Chest Panel當作Vendor Panel吧。 然後將多餘的Slot刪除,因為我們需要建立新的Vendor Slot,是專屬給商店用的Slot。 然後,將原本的Slot.cs刪除。 改成新的VendorSlot.cs。這個Slot的修改模式和EquipmentSlot很相似,大家也可以參考以前的文章唷: 5-15 Create Character Panel And Wear Equipment https://rpgcorecombat.blogspot.tw/2018/01/5-15-create-character-panel-and-wear.html VendorSlot.cs的完整程式碼如下: using System.Collections; using System.Collections.Generic; using UnityEngine; using UnityEngine.EventSystems; namespace RPG.Inventory{ public class VendorSlot : Slot { public override void OnPointerDown(PointerEventData eventData){ if (eventData.button == PointerEventData.InputButton.Right && inventorySystem.isPickedItem == false && transform.childCount > 0) { Item clickedItem = transform.GetChild (0).GetComponent ().Item; inventorySystem.BuyItem (clickedItem); } else if (eventData.button == PointerEventData.InputButton.Left &&