
6-12 Finishing Login User Interface
本章要繼續完成登入畫面,接著來佈置登入按鈕的部分吧。在Loing Window按右鍵,選擇UI/Button。

預設的按鈕真的很醜。

接著自己修改背景圖片跟Text的屬性,Text的部分可以參考我的設定。

設定好以後如下圖,但仍舊覺得文字只有單一白色實在太單調,跟按鈕的配色也不太合。

這邊介紹幾個好用的Script,待會提供原始碼,Gradient.cs可以替UI元件建立漸層色,如下圖設定。

接著文字就會有漸層色了。
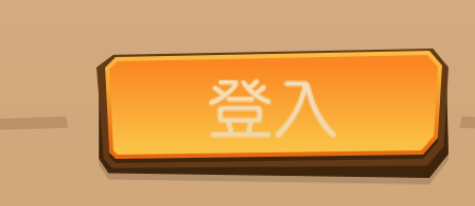
然後再使用NicerOutline.cs可以建立外邊框,如下圖設定。

文字的外邊框也做出來了,是否好看很多了呢。

接著替Button建立一個Image名為Press Overlay,這是我要用來自訂Button按下去時的陰影。

將陰影放進來後的結果如下圖,會將整個按鈕跟文字都蓋過去。

接著將Press Overlay拖拉進Button的Target Graphic中,並將Normal Color跟Highlighted Color的Alpha值設為0。這樣一來在普通狀態以及滑鼠移動到按鈕上的狀態,都不會將顯示這個陰影,只要按下去的時候才會出現。

設定完成如下圖。

以下提供Gradient跟NicerOutline的原始碼。
Gradient.cs:
NicerOutline.cs:
接著新增帳號跟密碼的輸入框,首先在LoginWindow底下新增Empty GameObject名為Content,然後再新增UI/Input Field。

新增InputField之後,先設定Placeholder,這個是用來顯示『提示文字』用的,設定可以參考如下圖。

接著也替該文字新增Shadow,增加立體感。

然後InputField底下的Text也記得與Placeholder使用相同設定。Text才是真正用來輸入文字的部分,輸入時InputField會自動將Placeholder上的提示文字隱藏。

設定完成後的效果應能如下圖。

接著我在InputField內在新增一個小icon。

接著我們替InputField新增一個Focus Overlay的Image吧,當使用者輸入文字的時候,框框的邊緣會有高亮效果。

新增的效果如下圖。

記得將Focus Overlay拖拉進Target Graphic中,並將Normal Color的Alpha值設為0,基本上設定手法與Button差不多。

這樣的話平時的InputField如下圖。

開始輸入文字的時候就會自動有發光的邊緣了。

然後讓我們把這個設定好的InputField直接Duplicate吧。

由於密碼框的輸入需要使用*字號隱藏,請在InputField的Content Type設定中選擇Password,即可達到這個效果。

剩下這個就自行調整吧,調整好如下圖。

可以使用我上一章提供的UIFlippable.cs將密碼框水平反轉,效果更好看。登入介面完成!


預設的按鈕真的很醜。

接著自己修改背景圖片跟Text的屬性,Text的部分可以參考我的設定。

設定好以後如下圖,但仍舊覺得文字只有單一白色實在太單調,跟按鈕的配色也不太合。

這邊介紹幾個好用的Script,待會提供原始碼,Gradient.cs可以替UI元件建立漸層色,如下圖設定。

接著文字就會有漸層色了。

然後再使用NicerOutline.cs可以建立外邊框,如下圖設定。

文字的外邊框也做出來了,是否好看很多了呢。

接著替Button建立一個Image名為Press Overlay,這是我要用來自訂Button按下去時的陰影。


接著將Press Overlay拖拉進Button的Target Graphic中,並將Normal Color跟Highlighted Color的Alpha值設為0。這樣一來在普通狀態以及滑鼠移動到按鈕上的狀態,都不會將顯示這個陰影,只要按下去的時候才會出現。

設定完成如下圖。

以下提供Gradient跟NicerOutline的原始碼。
Gradient.cs:
using UnityEngine;
using System.Collections.Generic;

namespace UnityEngine.UI
{
 [AddComponentMenu("UI/Effects/Gradient")]
#if UNITY_5_2 || UNITY_5_3_OR_NEWER
    public class Gradient : BaseMeshEffect
#else
    public class Gradient : BaseVertexEffect
#endif
    {
        [SerializeField] private Color topColor = Color.white;
  [SerializeField] private Color bottomColor = Color.black;

#if UNITY_5_2 || UNITY_5_3_OR_NEWER
        public override void ModifyMesh(VertexHelper vertexHelper)
        {
            if (!this.IsActive())
                return;

            List list = new List();
            vertexHelper.GetUIVertexStream(list);

            ModifyVertices(list);  // calls the old ModifyVertices which was used on pre 5.2

   vertexHelper.Clear();
            vertexHelper.AddUIVertexTriangleStream(list);
        }
#endif

#if UNITY_5_2 || UNITY_5_3_OR_NEWER
        public void ModifyVertices(List vertexList)
#else
        public override void ModifyVertices(List vertexList)
#endif
        {
            if (!this.IsActive())
    return;

   int count = vertexList.Count;
   float bottomY = vertexList[0].position.y;
   float topY = vertexList[0].position.y;

   for (int i = 1; i < count; i++)
   {
    float y = vertexList[i].position.y;
    if (y > topY)
    {
     topY = y;
    }
    else if (y < bottomY)
    {
     bottomY = y;
    }
   }

   float uiElementHeight = topY - bottomY;

   for (int i = 0; i < count; i++)
   {
    UIVertex uiVertex = vertexList[i];
    uiVertex.color = uiVertex.color * Color.Lerp(bottomColor, topColor, (uiVertex.position.y - bottomY) / uiElementHeight);
    vertexList[i] = uiVertex;
   }
  }
 }
}
NicerOutline.cs:
/// Credit Melang
/// Sourced from - http://forum.unity3d.com/members/melang.593409/

using System.Collections.Generic;

namespace UnityEngine.UI
{
 [AddComponentMenu("UI/Effects/Nicer Outline")]
#if UNITY_5_2 || UNITY_5_3_OR_NEWER
    public class NicerOutline : BaseMeshEffect
#else
 public class NicerOutline : BaseVertexEffect
#endif
 {
  [SerializeField]
  private Color m_EffectColor = new Color (0f, 0f, 0f, 0.5f);

  [SerializeField]
  private Vector2 m_EffectDistance = new Vector2 (1f, -1f);

  [SerializeField]
  private bool m_UseGraphicAlpha = true;
  //
  // Properties
  //
  public Color effectColor
  {
   get
   {
    return this.m_EffectColor;
   }
   set
   {
    this.m_EffectColor = value;
    if (base.graphic != null)
    {
     base.graphic.SetVerticesDirty ();
    }
   }
  }

  public Vector2 effectDistance
  {
   get
   {
    return this.m_EffectDistance;
   }
   set
   {
    if (value.x > 600f)
    {
     value.x = 600f;
    }
    if (value.x < -600f)
    {
     value.x = -600f;
    }
    if (value.y > 600f)
    {
     value.y = 600f;
    }
    if (value.y < -600f)
    {
     value.y = -600f;
    }
    if (this.m_EffectDistance == value)
    {
     return;
    }
    this.m_EffectDistance = value;
    if (base.graphic != null)
    {
     base.graphic.SetVerticesDirty ();
    }
   }
  }

  public bool useGraphicAlpha
  {
   get
   {
    return this.m_UseGraphicAlpha;
   }
   set
   {
    this.m_UseGraphicAlpha = value;
    if (base.graphic != null)
    {
     base.graphic.SetVerticesDirty ();
    }
   }
  }

#if UNITY_EDITOR
  protected override void OnValidate ()
  {
   this.effectDistance = this.m_EffectDistance;
   base.OnValidate ();
  }
#endif

  //
  // Methods
  //
  protected void ApplyShadow (List verts, Color32 color, int start, int end, float x, float y)
  {
   //Debug.Log("verts count: "+verts.Count);
   int num = verts.Count * 2;
   if (verts.Capacity < num)
   {
    verts.Capacity = num;
   }
   for (int i = start; i < end; i++)
   {
    UIVertex uIVertex = verts [i];
    verts.Add (uIVertex);

    Vector3 position = uIVertex.position;
    //Debug.Log("vertex pos: "+position);
    position.x += x;
    position.y += y;
    uIVertex.position = position;
    Color32 color2 = color;
    if (this.m_UseGraphicAlpha)
    {
     color2.a = (byte)(color2.a * verts [i].color.a / 255);
    }
    uIVertex.color = color2;
    //uIVertex.color = (Color32)Color.blue;
    verts [i] = uIVertex;
   }
  }

#if UNITY_5_2 || UNITY_5_3_OR_NEWER
        public override void ModifyMesh(VertexHelper vertexHelper)
        {
            if (!this.IsActive())
                return;

            List list = new List();
            vertexHelper.GetUIVertexStream(list);

            ModifyVertices(list);  // calls the old ModifyVertices which was used on pre 5.2

   vertexHelper.Clear();
            vertexHelper.AddUIVertexTriangleStream(list);
        }
#endif

#if UNITY_5_2 || UNITY_5_3_OR_NEWER
        public void ModifyVertices(List verts)
#else
        public override void ModifyVertices(List verts)
#endif
        {
            if (!this.IsActive ())
   {
    return;
   }

   Text foundtext = GetComponent();

   float best_fit_adjustment = 1f;

   if (foundtext && foundtext.resizeTextForBestFit)
   {
    best_fit_adjustment = (float)foundtext.cachedTextGenerator.fontSizeUsedForBestFit / (foundtext.resizeTextMaxSize-1); //max size seems to be exclusive

   }

   float distanceX = this.effectDistance.x * best_fit_adjustment;
   float distanceY = this.effectDistance.y * best_fit_adjustment;

   int start = 0;
   int count = verts.Count;
   this.ApplyShadow (verts, this.effectColor, start, verts.Count, distanceX, distanceY);
   start = count;
   count = verts.Count;
   this.ApplyShadow (verts, this.effectColor, start, verts.Count, distanceX, -distanceY);
   start = count;
   count = verts.Count;
   this.ApplyShadow (verts, this.effectColor, start, verts.Count, -distanceX, distanceY);
   start = count;
   count = verts.Count;
   this.ApplyShadow (verts, this.effectColor, start, verts.Count, -distanceX, -distanceY);

   start = count;
   count = verts.Count;
   this.ApplyShadow (verts, this.effectColor, start, verts.Count, distanceX, 0);
   start = count;
   count = verts.Count;
   this.ApplyShadow (verts, this.effectColor, start, verts.Count, -distanceX, 0);

   start = count;
   count = verts.Count;
   this.ApplyShadow (verts, this.effectColor, start, verts.Count, 0, distanceY);
   start = count;
   count = verts.Count;
   this.ApplyShadow (verts, this.effectColor, start, verts.Count, 0, -distanceY);
  }
 }
}
接著新增帳號跟密碼的輸入框,首先在LoginWindow底下新增Empty GameObject名為Content,然後再新增UI/Input Field。


接著也替該文字新增Shadow,增加立體感。

然後InputField底下的Text也記得與Placeholder使用相同設定。Text才是真正用來輸入文字的部分,輸入時InputField會自動將Placeholder上的提示文字隱藏。

設定完成後的效果應能如下圖。

接著我在InputField內在新增一個小icon。

接著我們替InputField新增一個Focus Overlay的Image吧,當使用者輸入文字的時候,框框的邊緣會有高亮效果。

新增的效果如下圖。

記得將Focus Overlay拖拉進Target Graphic中,並將Normal Color的Alpha值設為0,基本上設定手法與Button差不多。

這樣的話平時的InputField如下圖。

開始輸入文字的時候就會自動有發光的邊緣了。

然後讓我們把這個設定好的InputField直接Duplicate吧。

由於密碼框的輸入需要使用*字號隱藏,請在InputField的Content Type設定中選擇Password,即可達到這個效果。

剩下這個就自行調整吧,調整好如下圖。

可以使用我上一章提供的UIFlippable.cs將密碼框水平反轉,效果更好看。登入介面完成!

留言
張貼留言